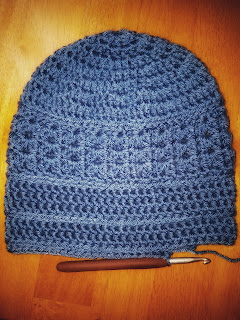
Above, we have the cap style version of the Spirit Beanie
Below, we have the slouchy version with an added band for color coordinating.
Below, we have the Spirit beanie being tested in a solid color. I wanted to see how it would look with all of it's texture and to say I am pleased is an understatement.
There was a happy dance or two
that took place lol!
It is a mild slouch so if you want more slouchiness.... make that brim extra long!
And here (below) we have the first take on the Spirit Beanie!
The very first one!
We will start off with the cap style version of this pattern. If you wanted to work the slouchy version with the extra band at the bottom (above the brim), the pattern will continue for it. I also added videos ....awful but hey, hopefully it helps!... to show how I go about doing the cluster V stitch and how to do the Half Double Crochet into the row of the cluster V stitches.
Cap style SPIRIT Beanie...
This is worked Top Down
Hook: 6mm
Yarn: 4 weight.
Stitches used: Half Double Crochet, Double Crochet, Half Double Crochet Front Post, Half Double Crochet Back Post, Cluster V stitch.
Abbreviations:
ch: chain
st(s): stitch, stitches
DC: double crochet
HDC: half double crochet
HDC FP: half double crochet front post
HDC BP: half double crochet back post
The Pattern...
1. ch 5. Join to make a circle
2. ch 2. 10 DC in round. Join. =10 sts
3. ch 2. 2 DC in every st, around. =20 sts
4. ch 2. Increase every 2nd st. (double crochet in same space as chain, 2 double crochets in next st, around). Join. =30 sts
5. ch 2. Increase every 3rd st. Join. =40 sts
6. ch 2. Increase every 4th st. Join. =50 sts
7. ch 2. Increase every 5th st. Join. =60 sts
8. ch 2. DC around in each st. Change color. Join.
9. ch 2. HDC around in each st. Join.
10. ch 2. HDC into the 3rd loop of each st. Join.
11. ch2. Cluster V st into every 3rd st. (Begin by doing the Cluster V st in the same space as ch 2, then skip 2 sts, work next Cluster V st into 3rd st. and continue this around). Change color at end of row. Join.
12. ch 2. slip stitch into center of first Cluster V st from beginning row. Work Cluster V st into center of every previous Cluster V st, around. Change color. Join.
13. ch 2. slip stitch into center of first Cluster V st from previous row. Work Cluster V st into center of every previous Cluster V st, around. Join.
14. ch 2. HDC around (watch video for further explanation on how to do this). Change color (back to primary color. The color used at the top of the beanie). Join.
15. ch 2. HDC into the 3rd loop of each st, around. Join.
16. ch 2. HDC around. Join.
17. ch 2. HDC around. Join.
(Now this is where you decide if you would like the cap style or the slouchy style. I am going to continue in the cap style and at the bottom we will continue in the slouchy style)
18. ch 2. HDC into the 3rd loop of each st, around. Join.
19. ch2. Work HDC FP in first st. Work HDC BP in 2nd st. Continue around alternating FP/BP sts. Join.
20. ch 2. Repeat step 19.
21. ch 2. Repeat step 19.
22. ch 2. Repeat step 19.
23. ch 2. Repeat step 19.
(you can end here knot off your work or try on the cap before you do and see how it fits and if the brim is long enough for you)
Continuing for the Slouchy version...
18. change color. ch 2. HDC around. Join.
19. ch 2. HDC into the 3rd loop of each st, around. Join.
20. ch 2. HDC around. Join.
21. ch 2. HDC around. Change color. (again, this would be a change back to the primary color, the color at the top of the beanie). Join.
22. ch 2. HDC into the 3rd loop of each st, around. Join.
23. ch 2. HDC around. Change color (this would change the color of the brim portion. color change is optional here). Join.
24. ch 2. HDC around. Join.
25. ch 2. HDC into the 3rd loop of each st, around. Join.
26. ch 2. Alternate the HDC FP and HDC BP st around. Join.
27. ch 2. Repeat step 26.
28. ch 2. Repeat step 26.
29. ch 2. Repeat step 26.
30. ch 2. Repeat step 26.
(This is where it ended for me for how much I liked the length of the brim and how I preferred it to slouch in the back. Continue for more slouchiness or end here)
And there you have it! The SPIRIT BEANIE is complete!
Yay!
As Captain and I always, always say...
Keep it safe, Keep it Clever,....Keep the Love, Peace, and Light.
Captain and Chell OUT
Until next time
;)


10. ch 2. HDC into the 3rd loop of each st. Join.
ReplyDeleteWhat 3rd loop?
I am posting a video tutorial on how to do this stitch.
ReplyDeleteI made this last night and really enjoyed it. I was just testing it with some scrap yarn so I ended up frogging it but I will def make another. Thank you :)
ReplyDeleteHow would you make this into a mens hat?
ReplyDeleteg153o4rdjpo868 wolf dildo,dog dildo,sex toys,sex dolls,sex chair,couples sexy toys,vibrators,sex chair,dildos o304z4bkieu409
ReplyDelete