Thursday, November 14, 2019

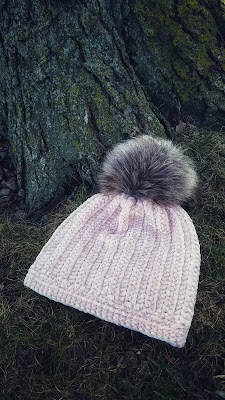
The 'Take a Bow" ear warmer and beanie!

A pattern by Michelle Plummer
of
5 Knots North


What you will need:

A medium weight four yarn

scissors
measuring tape
tapestry needle
5mm hook

Abbreviations:

ch-chain
st-stitch
sts-sts
dc-double crochet
hdc-half double crochet
hdc3rdloop-half double crochet in the 3 loop

video on how to crochet into the 3rd loop:


Adult size ear warmer will start the pattern and then, if wanting to make the beanie, follow included steps once the ear warmer height is reached.


Ribbing:

Ch 11. In 2nd ch from the hook, work sc. Sc into each ch following. 10 sc's

Turn, ch 1. In the back loop work sc and into each bl of each sc across.

Height of ribbing should be 2-21/2 inches tall.

Work *ch 1, sc in bl across, turn* for 70 rows or until (stretch your work just a bit for a more accurate measure) your band is 20 inches long.

Body:

1.  Lengthwise, fold in 1/2 so that both ends meet.  Join with 10-12 sc's. Then ch 2.

2.  Turn work right side out (flip band inside out I guess you could say lol) and work 70 hdc's evenly around band.  Join into 1st st of row, ch 2, in ch2 space work 1st hdc of new row in the 3rd loop.

3.  Continue working in 3rd loop of each st around. Join into 1st st and ch 2. (Chain 2 does not count as stitch)

4.  In ch 2 sp, work 5 dc's, skip 4 sts, work 5 dc's in 5th st.  You will continue this around.

5. When last shell is complete, ch 1 and slip  st into top of first shell from row just worked.

6. Ch 2. work 5 dc's in same space as ch 2. Look to next shell, on that shell count 3 sts and go into the 3rd st which should be right at the top. Work 5 dc's in same space.

7. Continue this around working a shell into the top of each shell from previous row.  Once last shell is completed, ch 1 and join into top of first shell from row just worked.

8.  Continue this pattern for 3 more rows.

9.  In fourth row/round you will start with a shell of 4 dcs, next shell 5 dcs, next shell 4 dcs, and continue this around.

***This should give you a total of 6 shell rows.

10.  Body of ear warmer should be 4 inches in height, not including the ribbing.  If you haven't reached 4 inches in height, add one more row and measure again.

Now we end the ear warmer. Watch following video for how to cinch it!


To make the Beanie, add 5 more rows of shells giving you a total number of 11 rows worked.

Body of Beanie should be 6 1/2 to 7 inches tall
and 8 1/2 to 9 inches wide

To close the top of the beanie, turn work inside out.  Take tapestry needle and yarn and work a slip st through each of the shells, staying as close to the edge as possible.  Then, once completed around, take the yarn and pull to scrunch up and close the top of the hat.  You want all the edges to be facing up when sewing through the top otherwise they will poke out of the top of the hat once turned right side out.


Knot off and weave in ends!  You are all done! YAY!!!


Thursday, September 12, 2019

Wayfaring Headband Pattern

This pattern was created by
Michelle Plummer
of
5 Knots North


Items needed:

a 5.mm hook and a 3.75mm hook

weight 4 yarn

measuring tape

Stitches used:

HDC-half double crochet
DC-double crochet
FP/BP DC-front post/back post double crochet
SC-single crochet

Pattern:
Brim:

with a 5mm hook, chain 9

in 2nd chain from the hook do HDC, (8 HDC)

Repeat HDC rows until work measures 19 to 20 inches long.

Chain 1 and fold band in half lengthwise and join with 8 SC

Refer to video here:


With a 3.75 hook, turn seam to inside and now fold band in half widthwise. 

Chain 2 and place 70 HDC evenly around the hat band. This will close the band to make it double brimmed with edges hidden.

Headband body:

With a 5mm hook, chain 2, and DC into each HDC, join, chain 2

*FP/BP DC alternately around.

Join with slip stitch to top of first stitch. (70)

Repeat FP/BP DC row 8 more times.

The Height of the ribbing work should be 3 1/2 inches.

If not at that height, repeat FP/BP DC row until you do.

When height is reached, join, knot off, and weave in end.

The completed height of this headband should be 4 1/2 inches with a width of 9-9 1/2 inches


If there are any further questions, please feel free to ask me on Facebook at 

(click on the link above to take you right to the Facebook site)

I do not get notifications of comments left here on this blog so please message me on Facebook.

I hope you enjoyed this pattern and feel free to share your work to my "5 Knots North" Facebook page!

Thank you and take care!

<3

-Michelle

Saturday, January 19, 2019

The "Soft and Sweet Beanie"....

A pattern by Michelle "Chellie" Plummer
of 
5 Knots North


This pattern requires Bernat Velvet.
As long as the measurements are followed, 
any yarn can be a good substitute.

Lion Brand's Vel-luxe
was used for the hat in Gold, pictured
above.  It is a lighter weight yarn
so a smaller hook was required (4.5mm)
along with a few additional stitches made.

I followed the measurements
given below
and it turned out perfect!

Find me on Facebook at
"5 Knots North"
and post/share your work!


Needed:

Bernat Velvet or any weight 4-5 yarn

5mm hook (Unless a different weight yarn is being used, then adjust accordingly)

Sewing needle

Thread, embroidery thread....a thread that won't snap or break when pulled!

Measuring tape

Pompom, if preferred...going without a pom looks great too!


Abbreviations: 

st=stitch
sts=stitches
dc=double crochet
hdc=half double crochet
sc=single crochet
ch=chain

Stitches used:

single crochet, double crochet, half double crochet.

Pattern:

1. ch 26
2. hdc in 2nd ch from hook, hdc across. =28 sts

you want this to be 7 1/2 inches in height.

3. turn, ch 2, work 1st dc in 1st st in the back loop and in each st across.
4.-36. repeat step 3.

you want to reach 18 1/2 inches in length...closer to 19 inches.  
also, wrap the piece around your head and check to make sure both ends meet to be able to close. 
this will stretch out the long rectangle a bit and a truer size will come about upon measuring. 


below you will find in the video tutorial how to sc up the two ends and join them together.


when using the Bernat Velvet, we are going to work 60-65 hdc's around into the bottom of the hat so we can begin our brim.


video below will show how to do this...


 Brim:

1. work 60-65 sts around bottom of the hat. join.
2. ch 2, work hdc  in each st around. join.
3. ch 2, work hdc in each st around. join.
4. ch2, work sc in each st around. join.

as picture above states, you want the brim to be about an inch long.

knot off, weave in ends, add a pompom (if ya want!) and 

taaa-daaaaa!!!

you have yourself a "Soft and Sweet" velvet beanie!


Beanie measurements upon completion:

Height: 9 1/2 inches (round about, this can be a tad bit longer or shorter, your call!)

Width: 10 to 10 1/2 inches.

Thank you so much for trying out my pattern and let me know if you have any questions on my Facebook page "5 Knots North"!

Have an awesome day!